Limit of Liability and Disclaimer: Reference to "this blog, website and media herein" refers to the blog and website, "concoctingbrews.weebly.com, and the email associated with the blog/website, concoctingbrews.weebly.com. This blog, website and media herein are designed to provide opinion, accurate and authoritative information, not legal advice in regard to the subject matter covered. This blog, website and the email associated with this blog/website aredistributed/displayed with the understanding that the author is not engaged in rendering legal, accounting, or other professional service. Before acting on any suggestion presented in this blog, website or media herein, professional assistance may be advisable. Cooking and brewing of beer can be dangerous and injuries may occur. The author specifically disclaim any liability, loss, or risk, personal or otherwise for application, directly or indirectly, of any advice or information presented in the blog, website and media herein. The author in no way guarantees the accuracy of any of the information appearing in this blog, website or media herein and the opinions stated in this blog, website and media herein. The opinions stated herein are not guaranteed or warranted to produce any particular results, and the advice and strategies contained in the blog/website and media herein may not be suitable for every individual. The website, blog and media herein shall not be liable for any loss of profit or any other commercial damages including but not limited to special, incidental, consequential, or other damages.
I had started with a kit called "Mr. Beer" to make my first brew with something called dry malt extract. It was really easy to make my first batch. Even though these kits take care of all the details to get your first brew you can't vary it much. You can still try one of these kits to get a feel for homebrewing. I picked up 2 more kits before I really started with all-grain brewing: Craft-A-Brew and Brooklyn Brew Shop were the 2 other kits that let me try to brew other beers. Most kits are basically ales which can be brewed close to room temperature. Those are ideal in apartments or houses without basements. If you live in an apartment you may want to stick with ales or kits to make beer. This blog will focus on lagers that will need a colder temperature in a basement, mini-fridge or refrigerator. I will show you it isn't as hard to brew a lager as one might think. I have a couple of ways to work around the fact I can't reach 50 degrees in my refrigerator. I'll give you my ideas on how to brew if you are trying to keep costs low.
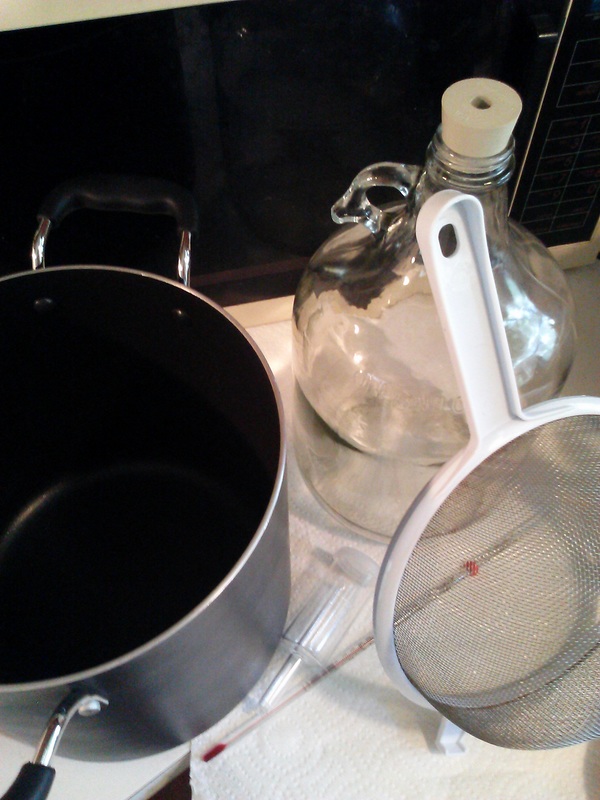
The picture above shows some of the items you need when you brew. I do 1 gallon batches. The advantage is that if I screw up the batch I've only botched a gallon and not 5 gallons as other homebrewers do. Let's look at what's involved on brew day:
1. GET YOUR BREW UTENSILS AND SUPPLIES TOGETHER: Gather a large pot with enough volume to hold 1 gallon and some grains. The bigger the pot the better. I use a T-Fal pot to mash in. You will also need a thermometer, an air lock, a carboy, rubber stopper and a strainer. You may need a a piece of plastic called a blow off hose. This is some plastic tubing that will allow the air bubbles of fermentation to escape the vessel where you are doing the fermenting. Later, another pot or two may also come in handy for sparging. Some of these items aren't pictured above. Many homebrewers differ with me on this, but I don't use a hydrometer! The beer kits don't use one and if you take the time to do it right to make good beer you'll know if you have alcohol in it after the first bottle. I go after taste and am not out to find out how much alcohol is in it. If you want to spend the money to buy one, calculate the original gravity and final gravity to determine it that's fine. In this blog, I'm covering the simplest way to make all grain beer without the expenses. Call this homebrewing made simple.
2. MASH POT AND GRAINS: Some of the books say that you need 1 quart of water matched to every pound of grain. I try to start with 2/3 of a pot filled with water leaving a third of the volume for the grain. I will have purchased about 2 1/4 pounds of grain to make beer previously. Now, you can have the grains placed into a grain bag for the convenience of pulling them out later. I find the grain bag are an additional cost over time and would rather strain the pot later with a strainer pictured above.
3. GET TO THE RIGHT TEMP: Heat the pot with water to about 163 degrees Fahrenheit. While you are waiting for the pot to heat, you can use the Star San cleaner to clean everything except for the mash pot that is heating water. It is always a good idea that you washed all items with dish washing liquid previous to brewing beer to get everything clean. Star San is really just to sanitize your items.
4. MASH PROCEDURE: Once the pot has reached 163 degrees, you can take if off the burner. Pour the grains into the pot and the water level should be close to 1 inch from the top of the pot. Stir the grains in the water. A temperature reading should show a drop of about 10 degrees. (Some grains don't need a full hour and check with your local brew shop for supplies. Some of these specialty grains don't need more than 15 minutes to soak. Some of these might need to steep at 160 to 170 degrees so be sure to check with the local brew shop or online store where you got them for cooking instructions.) I'll give you the same instructions my local brew shop told me: try to hold the mash (your grains and water) in the 150's temperature. After you're in the 150's, take the pot off the burner and shut the burner off. Place the lid on the pot and wait 10 minutes. After 10 minutes, take the lid off and stir the mixture. Take the temperature. If you are close to 150 or below turn the stove burner on the lowest setting. Keep stirring the mixture and taking temperature every 3 to 4 minutes. You don't want it to go past 158 degrees. If is at 157 or more, take it off the burner, stir it and put the lid on the pot. Shut the burner off. Keep repeating this step to keep the mash inside this range of 150 to 158 degrees for about an hour.
5. MASH OUT: After an hour of this cooking in the 150's, some books talk about a mash out at above 170 degrees Fahrenheit. So many books vary on this that I'm unsure if it is absolutely necessary. My own brew shop said it isn't needed with the modified grains these days. Some books talk about mash out at just under 170 degrees. I don't see it as totally necessary and can't seem to tell if it makes a difference. Some of the specialty grains don't require it all and just need a steeping mentioned earlier.
I had started with a kit called "Mr. Beer" to make my first brew with something called dry malt extract. It was really easy to make my first batch. Even though these kits take care of all the details to get your first brew you can't vary it much. You can still try one of these kits to get a feel for homebrewing. I picked up 2 more kits before I really started with all-grain brewing: Craft-A-Brew and Brooklyn Brew Shop were the 2 other kits that let me try to brew other beers. Most kits are basically ales which can be brewed close to room temperature. Those are ideal in apartments or houses without basements. If you live in an apartment you may want to stick with ales or kits to make beer. This blog will focus on lagers that will need a colder temperature in a basement, mini-fridge or refrigerator. I will show you it isn't as hard to brew a lager as one might think. I have a couple of ways to work around the fact I can't reach 50 degrees in my refrigerator. I'll give you my ideas on how to brew if you are trying to keep costs low.
The picture above shows some of the items you need when you brew. I do 1 gallon batches. The advantage is that if I screw up the batch I've only botched a gallon and not 5 gallons as other homebrewers do. Let's look at what's involved on brew day:
1. GET YOUR BREW UTENSILS AND SUPPLIES TOGETHER: Gather a large pot with enough volume to hold 1 gallon and some grains. The bigger the pot the better. I use a T-Fal pot to mash in. You will also need a thermometer, an air lock, a carboy, rubber stopper and a strainer. You may need a a piece of plastic called a blow off hose. This is some plastic tubing that will allow the air bubbles of fermentation to escape the vessel where you are doing the fermenting. Later, another pot or two may also come in handy for sparging. Some of these items aren't pictured above. Many homebrewers differ with me on this, but I don't use a hydrometer! The beer kits don't use one and if you take the time to do it right to make good beer you'll know if you have alcohol in it after the first bottle. I go after taste and am not out to find out how much alcohol is in it. If you want to spend the money to buy one, calculate the original gravity and final gravity to determine it that's fine. In this blog, I'm covering the simplest way to make all grain beer without the expenses. Call this homebrewing made simple.
2. MASH POT AND GRAINS: Some of the books say that you need 1 quart of water matched to every pound of grain. I try to start with 2/3 of a pot filled with water leaving a third of the volume for the grain. I will have purchased about 2 1/4 pounds of grain to make beer previously. Now, you can have the grains placed into a grain bag for the convenience of pulling them out later. I find the grain bag are an additional cost over time and would rather strain the pot later with a strainer pictured above.
3. GET TO THE RIGHT TEMP: Heat the pot with water to about 163 degrees Fahrenheit. While you are waiting for the pot to heat, you can use the Star San cleaner to clean everything except for the mash pot that is heating water. It is always a good idea that you washed all items with dish washing liquid previous to brewing beer to get everything clean. Star San is really just to sanitize your items.
4. MASH PROCEDURE: Once the pot has reached 163 degrees, you can take if off the burner. Pour the grains into the pot and the water level should be close to 1 inch from the top of the pot. Stir the grains in the water. A temperature reading should show a drop of about 10 degrees. (Some grains don't need a full hour and check with your local brew shop for supplies. Some of these specialty grains don't need more than 15 minutes to soak. Some of these might need to steep at 160 to 170 degrees so be sure to check with the local brew shop or online store where you got them for cooking instructions.) I'll give you the same instructions my local brew shop told me: try to hold the mash (your grains and water) in the 150's temperature. After you're in the 150's, take the pot off the burner and shut the burner off. Place the lid on the pot and wait 10 minutes. After 10 minutes, take the lid off and stir the mixture. Take the temperature. If you are close to 150 or below turn the stove burner on the lowest setting. Keep stirring the mixture and taking temperature every 3 to 4 minutes. You don't want it to go past 158 degrees. If is at 157 or more, take it off the burner, stir it and put the lid on the pot. Shut the burner off. Keep repeating this step to keep the mash inside this range of 150 to 158 degrees for about an hour.
5. MASH OUT: After an hour of this cooking in the 150's, some books talk about a mash out at above 170 degrees Fahrenheit. So many books vary on this that I'm unsure if it is absolutely necessary. My own brew shop said it isn't needed with the modified grains these days. Some books talk about mash out at just under 170 degrees. I don't see it as totally necessary and can't seem to tell if it makes a difference. Some of the specialty grains don't require it all and just need a steeping mentioned earlier.
 RSS Feed
