  |   |
Limit of Liability and Disclaimer: Reference to "this blog, website and media herein" refers to the blog and website, "concoctingbrews.weebly.com, and the email associated with the blog/website, concoctingbrews.weebly.com. This blog, website and media herein are designed to provide opinion, accurate and authoritative information, not legal advice in regard to the subject matter covered. This blog, website and the email associated with this blog/website aredistributed/displayed with the understanding that the author is not engaged in rendering legal, accounting, or other professional service. Before acting on any suggestion presented in this blog, website or media herein, professional assistance may be advisable. Cooking and brewing of beer can be dangerous and injuries may occur. The author specifically disclaim any liability, loss, or risk, personal or otherwise for application, directly or indirectly, of any advice or information presented in the blog, website and media herein. The author in no way guarantees the accuracy of any of the information appearing in this blog, website or media herein and the opinions stated in this blog, website and media herein. The opinions stated herein are not guaranteed or warranted to produce any particular results, and the advice and strategies contained in the blog/website and media herein may not be suitable for every individual. The website, blog and media herein shall not be liable for any loss of profit or any other commercial damages including but not limited to special, incidental, consequential, or other damages.
I usually wait for 9-10 days after I've brewed beer before I bottle. So, if I brewed on Sunday I'd wait till the following week on Tuesday to bottle. It is still timed to my days off to brew or bottle. Brewing may take a good 8 hours and that doesn't involve the cleanup. Bottling may take 2-3 hours.
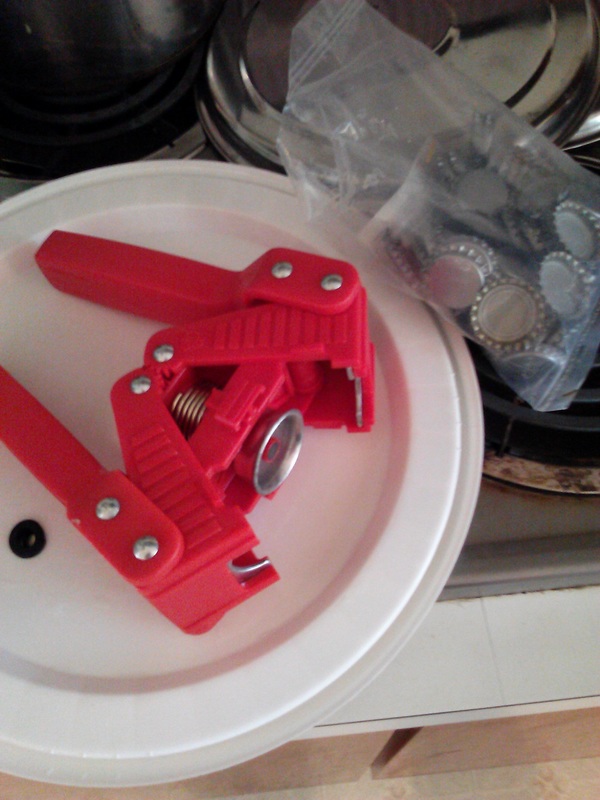
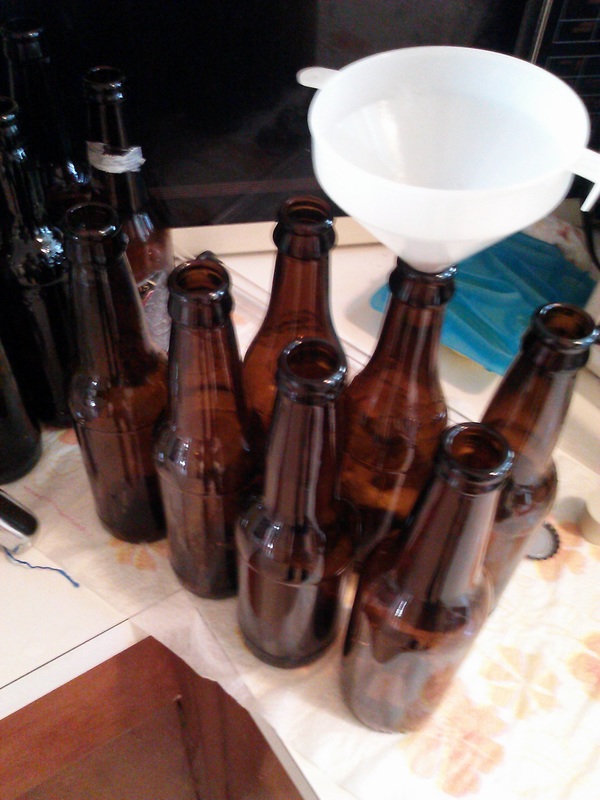
1. PREPARATION: At least 10 12 oz bottles, racking cane, funnel, and plastic hose are needed to be clean before you start. I use a bottling bucket, available at your local brew store, to sanitize my items. You will also need a capper like the one pictured in the upper left photo. Caps will be needed to cap onto your beer bottles in order that they carbonate or lager (chill in the fridge). Some brewers use old Grolsch bottles which have an easy clamp on top. You can save the cost of buying caps. You can see that I have only 9 bottles in the sink ready for bottling. I tend to loose some beer in the whole process and my best is usually 9. The 1/2 a beer bottle of beer ends up being a swig for later; I'll put it in the fridge too cool down so I can taste it later. In the top right corner photo you can see I am using a funnel. All my items: bottles, cane, funnel, hose are cleaned in the bottling bucket using Star San. Some other cleaners out there have a slippery feel to them and I've almost dropped a bottle using the competitor's products. Star San is just a sanitizer. Look to the beginning of this blog to make sure you are cleaning your items before sanitizing.
2. ADD PRIMING SUGAR: You can carbonate your beer in the bottles and I follow this method. I use the funnel on each bottle when I add 3/4 teaspoon of sugar to each 12 oz bottle. I only use regular table sugar or brown sugar (like what you use to make homemade oatmeal). I don't spend the money on expensive cane sugars. I tried adding 4 raisins to each bottle, each raisin cut in half, to carbonate also. However, when you go to pour a glass be sure strain out the raisins before you serve it to guests. I tried the raisins but decided I won't use that method to carbonate anymore. Brown sugar may change the color of your beer for darker if you don't mind. Plain table sugar, some say, gives your beer a cider taste to it. I've brewed some dark beers and I haven't found a cider taste yet. Brown sugar may clump in the funnel but you can use a toothpick to push it through the funnel. Table sugar pours pretty steady into the bottle without the clumping. Use one or the other for each bottle.
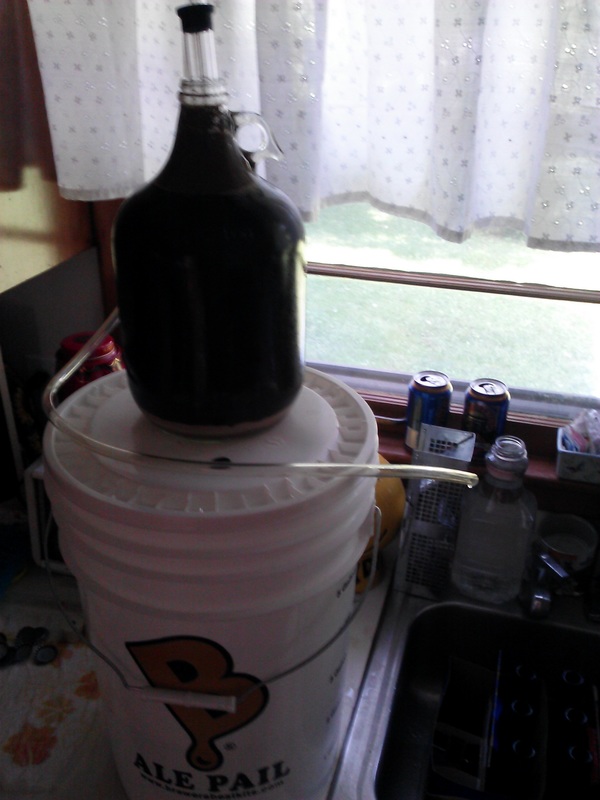
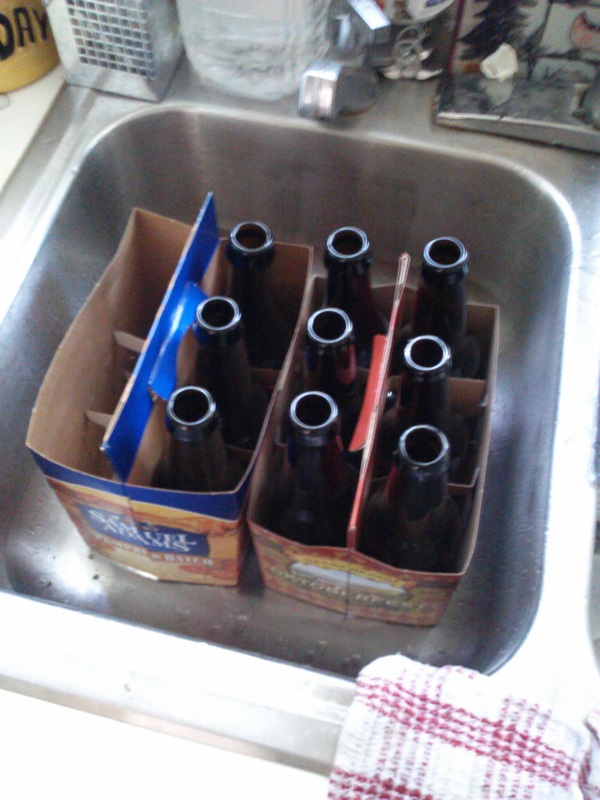
3. BEER TRANSFER: I place the bottling bucket on the counter with my carboy of beer on top (see lower left photo above). You will need to heat the end of the plastic hose in hot water to get it to expand to go over the end of your racking cane or auto-siphon. I use an auto-siphon instead of a racking cane. I just find it easier - a couple of pumps to the auto-siphon and the beer is flowing. I recommend it to a beginner. The beer videos show how to get a siphon going with a racking cane, but it takes some getting used to while you try not making a mess in the kitchen. I've been debating on getting a bottling bucket with a spigot so I can pour my beer into a bottle by just twisting the spigot on and off. Anyway, the height of the carboy helps to keep the siphon going as the beer transfers into each individual bottle. A couple pumps of the auto-siphon and the beer comes into the tube and down into the bottle where I'm holding in the bottle. I just pinch the end of the hose, with my fingers, to stop the flow before I move to the next bottle to fill. It is best done in the sink because there can be a mess. This is where beer loss can happen as you see it drain down the sink. Notice, my bottom right photo shows that the 6-pack holders make a great holder for filling your bottles with beer.
4. CARBONATING THE BEER: Some instructions say you can place the bottles back in the place where you were fermenting and that's fine. Some instructions say 1 to 2 weeks for the best taste. We have a ledge in our basement near the ceiling that hits about 69 degrees in the summer. In the winter, the furnace runs and gets us just above 68 degrees on the ground floor. Those 2 places would be ideal for making ales. My lagers ferment in a basement closet that goes from 59 degrees in winter to about 63 degrees in the summer. Ideally, lagers would be best in that closet in January when it is coldest. I'm testing to see if it makes that much difference to brew lagers at 63 or at 59. Both end up in the fridge for about 6 weeks to condition (lager) to get rid of those "off" flavors. As I test yeast, I will let you know more about that when the time comes.
5. REFRIGERATION/LAGERING: I make lagers now instead of ales. Most beginners should start with a beer kit or ales. They are easier and seem to work better in an apartment. If you don't have air conditioning or a basement your best bet is to wait for late fall. You've got to get 68 to 72 degrees to make some ale. Some of the beer kits say 1 to 2 weeks in the fridge to condition them is best. After you've fermented and bottled at this temperature you can move them to a refrigerator.
Note: If you tasted a little bit of beer left over that didn't make a full bottle - judge the taste of that partial beer. If it doesn't taste that good, but you find it is good enough to drink go with about 1 week to carbonate and 1 week in the fridge before you drink it. Don't spend a lot of time conditioning bad beer. Some of the off flavors will go away in refrigeration, but a really bad tasting beer may not change that much. Drink it up soon and get the beer equipment all cleaned up for your next try. Get that so-so beer drank up to clear room in the refrigerator for the good stuff about to be brewed.
I usually wait for 9-10 days after I've brewed beer before I bottle. So, if I brewed on Sunday I'd wait till the following week on Tuesday to bottle. It is still timed to my days off to brew or bottle. Brewing may take a good 8 hours and that doesn't involve the cleanup. Bottling may take 2-3 hours.
1. PREPARATION: At least 10 12 oz bottles, racking cane, funnel, and plastic hose are needed to be clean before you start. I use a bottling bucket, available at your local brew store, to sanitize my items. You will also need a capper like the one pictured in the upper left photo. Caps will be needed to cap onto your beer bottles in order that they carbonate or lager (chill in the fridge). Some brewers use old Grolsch bottles which have an easy clamp on top. You can save the cost of buying caps. You can see that I have only 9 bottles in the sink ready for bottling. I tend to loose some beer in the whole process and my best is usually 9. The 1/2 a beer bottle of beer ends up being a swig for later; I'll put it in the fridge too cool down so I can taste it later. In the top right corner photo you can see I am using a funnel. All my items: bottles, cane, funnel, hose are cleaned in the bottling bucket using Star San. Some other cleaners out there have a slippery feel to them and I've almost dropped a bottle using the competitor's products. Star San is just a sanitizer. Look to the beginning of this blog to make sure you are cleaning your items before sanitizing.
2. ADD PRIMING SUGAR: You can carbonate your beer in the bottles and I follow this method. I use the funnel on each bottle when I add 3/4 teaspoon of sugar to each 12 oz bottle. I only use regular table sugar or brown sugar (like what you use to make homemade oatmeal). I don't spend the money on expensive cane sugars. I tried adding 4 raisins to each bottle, each raisin cut in half, to carbonate also. However, when you go to pour a glass be sure strain out the raisins before you serve it to guests. I tried the raisins but decided I won't use that method to carbonate anymore. Brown sugar may change the color of your beer for darker if you don't mind. Plain table sugar, some say, gives your beer a cider taste to it. I've brewed some dark beers and I haven't found a cider taste yet. Brown sugar may clump in the funnel but you can use a toothpick to push it through the funnel. Table sugar pours pretty steady into the bottle without the clumping. Use one or the other for each bottle.
3. BEER TRANSFER: I place the bottling bucket on the counter with my carboy of beer on top (see lower left photo above). You will need to heat the end of the plastic hose in hot water to get it to expand to go over the end of your racking cane or auto-siphon. I use an auto-siphon instead of a racking cane. I just find it easier - a couple of pumps to the auto-siphon and the beer is flowing. I recommend it to a beginner. The beer videos show how to get a siphon going with a racking cane, but it takes some getting used to while you try not making a mess in the kitchen. I've been debating on getting a bottling bucket with a spigot so I can pour my beer into a bottle by just twisting the spigot on and off. Anyway, the height of the carboy helps to keep the siphon going as the beer transfers into each individual bottle. A couple pumps of the auto-siphon and the beer comes into the tube and down into the bottle where I'm holding in the bottle. I just pinch the end of the hose, with my fingers, to stop the flow before I move to the next bottle to fill. It is best done in the sink because there can be a mess. This is where beer loss can happen as you see it drain down the sink. Notice, my bottom right photo shows that the 6-pack holders make a great holder for filling your bottles with beer.
4. CARBONATING THE BEER: Some instructions say you can place the bottles back in the place where you were fermenting and that's fine. Some instructions say 1 to 2 weeks for the best taste. We have a ledge in our basement near the ceiling that hits about 69 degrees in the summer. In the winter, the furnace runs and gets us just above 68 degrees on the ground floor. Those 2 places would be ideal for making ales. My lagers ferment in a basement closet that goes from 59 degrees in winter to about 63 degrees in the summer. Ideally, lagers would be best in that closet in January when it is coldest. I'm testing to see if it makes that much difference to brew lagers at 63 or at 59. Both end up in the fridge for about 6 weeks to condition (lager) to get rid of those "off" flavors. As I test yeast, I will let you know more about that when the time comes.
5. REFRIGERATION/LAGERING: I make lagers now instead of ales. Most beginners should start with a beer kit or ales. They are easier and seem to work better in an apartment. If you don't have air conditioning or a basement your best bet is to wait for late fall. You've got to get 68 to 72 degrees to make some ale. Some of the beer kits say 1 to 2 weeks in the fridge to condition them is best. After you've fermented and bottled at this temperature you can move them to a refrigerator.
Note: If you tasted a little bit of beer left over that didn't make a full bottle - judge the taste of that partial beer. If it doesn't taste that good, but you find it is good enough to drink go with about 1 week to carbonate and 1 week in the fridge before you drink it. Don't spend a lot of time conditioning bad beer. Some of the off flavors will go away in refrigeration, but a really bad tasting beer may not change that much. Drink it up soon and get the beer equipment all cleaned up for your next try. Get that so-so beer drank up to clear room in the refrigerator for the good stuff about to be brewed.
 RSS Feed
